Tuesday, May 3, 2016
Friday, August 2, 2013
COMFIGURE OUTLOOK 2007 WITH GMAIL ACCOUNT
To configure Outlook 2007 for your Gmail address:
- Enable POP in your email account. Don't forget to click Save Changes when you're done.
- Open Outlook.
- Click the Tools menu, and select Account Settings...
- On the E-mail tab, click New...
- If you are prompted to Choose E-mail Service, select Microsoft Exchange, POP3, IMAP, or HTTP, and click Next.
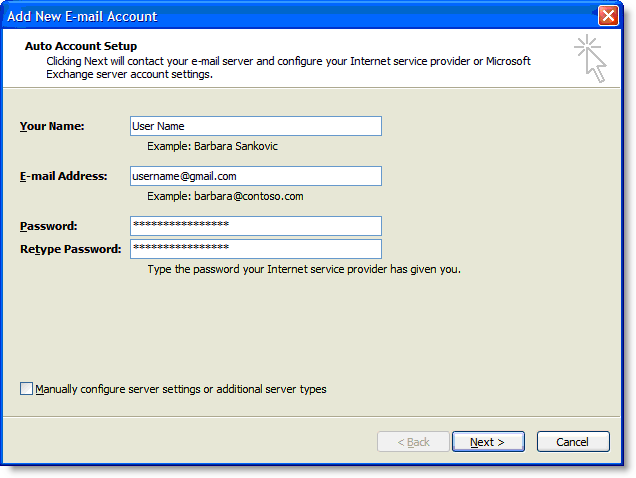
- Fill in all necessary fields to include the following information: Your Name: Enter your name as you would like it to appear in the From: field of outgoing messages.
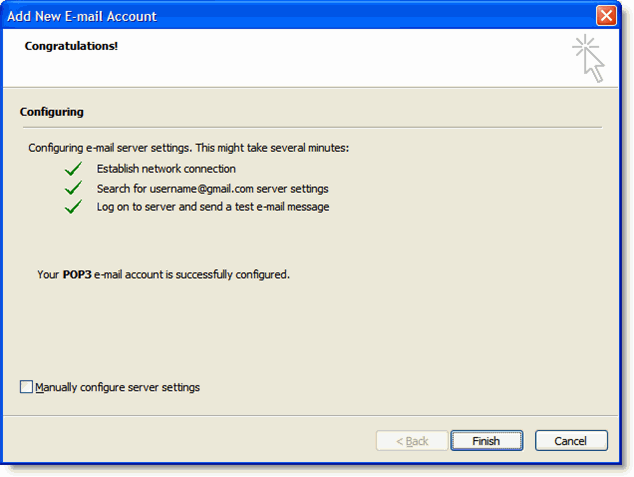
- Click Next. If you are configuring Outlook 2007 automatically, you're done! Just click Finish.
- If you are configuring Outlook 2007 manually, select Internet E-mail and click Next.
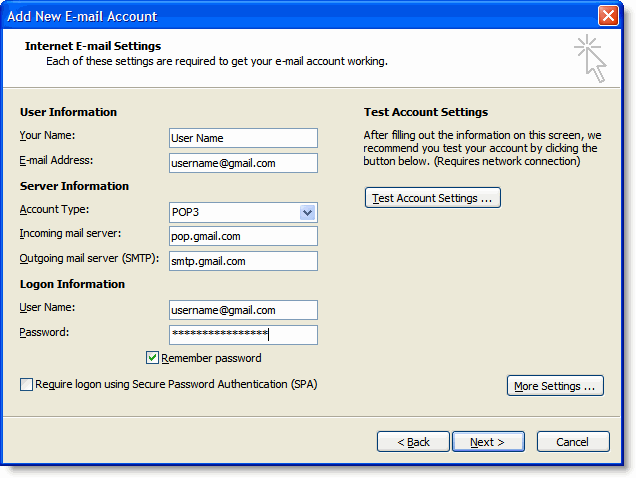
- Verify your User Information, and enter the following additional information: Server Information
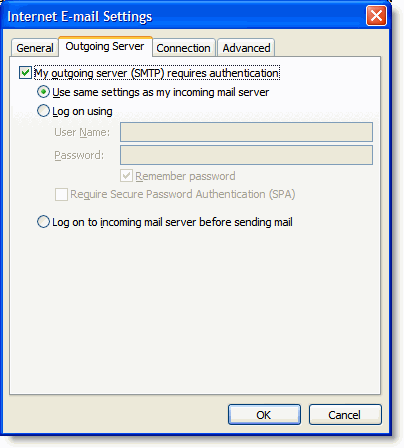
- Click the More Settings... button, and select the Outgoing Server tab.
- Check the box next to My outgoing server (SMTP) requires authentication and select Use same settings as my incoming mail server.
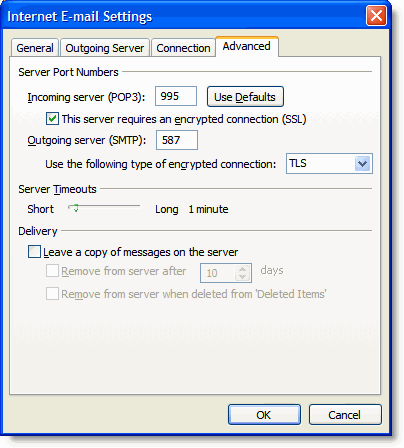
- Click the Advanced tab, and check the box next to This server requires an encrypted connection (SSL) under Incoming Server (POP3).
- In the Outgoing server (SMTP) box, enter 587, and select TLS from the drop-down menu next to Use the following type of encrypted connection:.
- Click OK.
- Click Test Account Settings... After receiving 'Congratulations! All tests completed successfully', click Close.
- Click Next, and then click Finish.
Email Address: Enter your full Gmail email address (username@gmail.com). Google Apps users, enter your full address in the formatusername@your_domain.com.
Password: Enter your email password.
Manually configure server settings or additional server types: Leave this option unchecked if you want to automatically configure Outlook 2007. If you want to manually configure Outlook 2007, check this box now. Google Apps users should configure manually as follows.


Account Type: POP3
Incoming mail server: pop.gmail.com (Google Apps users, enter the server names provided, don't add your domain name in these steps)
Outgoing mail server (SMTP): smtp.gmail.com
Logon Information
User Name: Enter your Gmail username (including @gmail.com). Google Apps users, enter your full address in the format username@your_domain.com
Password: Enter your email password.
Require logon using Secure Password Authentication (SPA): Leave this option unchecked.


Sunday, May 20, 2012
Routing And Remote Access
Routing and Remote Access is
essentially a software router that can be configured to connect separate
network segments.
What is Routing?????
Routing is a process of
transferring data accros an interconnected network from one LAN to another.
In IP networks, routing is
performed according to IP routing tables. All IP host use routing table to
forward IP traffic.
Routing and Remote Access
services can be configured for LAN to LAN, LAN to WAN, VPN & NAT routing
through IP networks.
Hardware routers include many built-in ports, each of which typically connects to a distinct network segment. The hardware router can route traffic from any one port to another. For Routing And Remote Access, however, the number of network segments among which traffic can be routed is limited by the number of network interfaces installed on the Windows Server 2003 computer running the service. For example, if you have configured your Windows Server 2003 computer with two network cards and a modem, the Routing And Remote Access service can route traffic among three networks.
For an example of a Windows Server 2003 computer running the Routing And Remote Access service and configured with four network adapters. In this scenario, the Routing And Remote Access service is routing IP traffic among four LANs.
Windows 2003 server configured with four NIC card:
Enabling Routing
And Remote Access
The Routing And Remote Access service is installed by Windows Server 2003 Setup in a disabled state. You can enable and configure the service by running the Routing And Remote Access Server Setup Wizard. Note that if the server on which you want to configure the Routing And Remote Access service is a member server of an Active Directory domain.
Friday, November 18, 2011
What are the system recovery options in Windows 7?
The System Recovery Options menu contains several tools, such as Startup Repair, that can help you recover Windows from a serious error. This set of tools is on your computer's hard disk and on the Windows installation disc.
Notes
You can also create a system repair disc that contains the System Recovery Options menu.
If you use a Tablet PC or other computer with a touchscreen, you might need to connect a keyboard and mouse in order to use Startup Repair and the other tools in the System Recovery Options menu.
The 'System Recovery Options' are a set of 5 tools, listed below, which can be used to repair or recover a damaged operating system:
• Startup Repair - can be used to scan your computer and fix missing or damaged system files that prevent Windows from starting correctly.
• System Restore - can be used to restore Windows system files to the state of an earlier point in time, while leaving all your user files untouched. You can use System Restore when you want to revert to an earlier configuration which you know it worked properly. For example, if you installed multiple applications and you are suddenly experiencing random restarts, boot failures and Startup Repair failed to fix anything, the quickest way to solve the problem is to use System Restore.
NOTE: In order to use System Restore you must have at least one system restore point previously created.
• System Image Recovery - can be used to restore a system image. When everything else fails, this can be the solution to your problems. When Startup Repair and System Restore are not helping.
NOTE: In order to use this tool you must have a previously created system image file..
• Windows Memory Diagnostic - scans your computer's memory for errors.
• Command Prompt - can be used by advanced users to perform recovery-related operations. These operations should only be used by advanced users. If you are not sure on what you are doing, you can end-up with your Windows 7 in a state which is a lot worse than before.
There are two ways of accessing the 'System Recovery Options': from the Windows 7 installation DVD or directly from your hard-disk
Notes
You can also create a system repair disc that contains the System Recovery Options menu.
If you use a Tablet PC or other computer with a touchscreen, you might need to connect a keyboard and mouse in order to use Startup Repair and the other tools in the System Recovery Options menu.
The 'System Recovery Options' are a set of 5 tools, listed below, which can be used to repair or recover a damaged operating system:
• Startup Repair - can be used to scan your computer and fix missing or damaged system files that prevent Windows from starting correctly.
• System Restore - can be used to restore Windows system files to the state of an earlier point in time, while leaving all your user files untouched. You can use System Restore when you want to revert to an earlier configuration which you know it worked properly. For example, if you installed multiple applications and you are suddenly experiencing random restarts, boot failures and Startup Repair failed to fix anything, the quickest way to solve the problem is to use System Restore.
NOTE: In order to use System Restore you must have at least one system restore point previously created.
• System Image Recovery - can be used to restore a system image. When everything else fails, this can be the solution to your problems. When Startup Repair and System Restore are not helping.
NOTE: In order to use this tool you must have a previously created system image file..
• Windows Memory Diagnostic - scans your computer's memory for errors.
• Command Prompt - can be used by advanced users to perform recovery-related operations. These operations should only be used by advanced users. If you are not sure on what you are doing, you can end-up with your Windows 7 in a state which is a lot worse than before.
There are two ways of accessing the 'System Recovery Options': from the Windows 7 installation DVD or directly from your hard-disk
Tuesday, August 2, 2011
Make Windows Bootable USB Drive without any Software
Note-OS required Windows,Window 7 DVD & 4 GB Pendrive.
Step1- Login as Administrator
Step2- Format Pendrive in NTFS & make it Active
Step3-Open cmd prompt & Type the following command now:
F:\>CD BOOT and hit enter.Where “F” is your DVD drive letter & G: for USB drive
CD BOOT and hit enter to see the below message.
7. Type another command given below to update the USB drive with BOOTMGR compatible code.
Step4- Copy All Contents from windows 7 DVD to pendrive & install win7 in Mini laptop,notebook from pen drive.
Saturday, July 9, 2011
Use Flash Memory (USB) as Virtual RAM in Windows 7 and Vista
Steps to convert USB memory in to virual RAM memory follow the steps below.
1. Connect USB memory to the computer (Vista or Windows 7)
2. Right click on USB drive and take properties
3. Click on tab ReadyBoost and apply
Note:-In Windows Vista it is limited to 4 GB while in Windows 7 it is upto 256 GB of additional memory by connecting maximum 8 different USB memories. Windows OS older than Vista don't support ReadyBoost technology. Currently Windows Server 2008 is also not supporting ReadyBoost technology.
Saturday, May 21, 2011
Recovery Console.........?
The Recovery Console is a command line based, advanced diagnostic feature available in some versions of the Windows operating system.
What is the Recovery Console Used For?:
The Recovery Console is used to help resolve a number of major system problems.
The Recovery Console is particularly useful for repairing or replacing important operating system files. When these files aren't working like they should, Windows will sometimes not startup at all. In these cases, you must start the Recovery Console to restore the files.
The Recovery Console is usually accessed from the original Windows installation CD. Alternatively, Recovery Console can be accessed from the boot menu but only if it has been preinstalled on your system.
The Recovery Console is particularly useful for repairing or replacing important operating system files. When these files aren't working like they should, Windows will sometimes not startup at all. In these cases, you must start the Recovery Console to restore the files.
How is the Recovery Console Accessed?:
Recovery Console Availability:
The Recovery Console feature is available in Windows XP, Windows 2000, and Windows Server 2003.
Recovery Console is not available in Windows 7 or Windows Vista. Windows Server 2003 and Windows XP were the last Microsoft operating systems that contained Recovery Console.
Subscribe to:
Posts (Atom)
Virtualization
What is Virtualization? Virtualization is the process of creating a software-based (or virtual) representation of something rather than a...
-
The following post is on will tell you some methods to increase your internet speed,I will show you some ways to increase your net and brows...
-
Routing and Remote Access is essentially a software router that can be configured to connect separate network segments. What is ...
-
The System Recovery Options menu contains several tools, such as Startup Repair, that can help you recover Windows from a serious error. Thi...